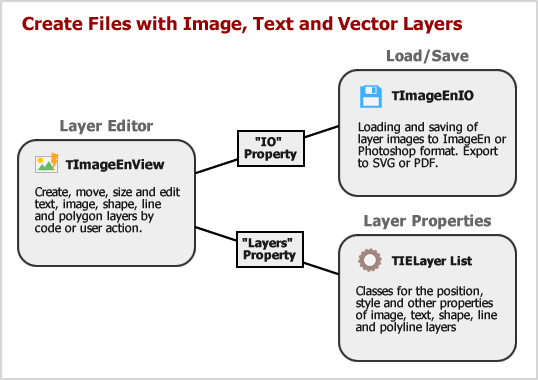
TImageEnView supports layer editing, allowing your users to build complex images from text, shapes, lines, polygon and other images, and merge them. All layer types can be created, resized, rotated and moved, either programmatically or by the user.
Layer Types
| Kind | Class | Description | Example |
|---|---|---|---|
| ielkImage | TIEImageLayer | Layer that contains an image |  |
| ielkShape | TIEShapeLayer | Layer that displays standard shapes, such as rectangles, ellipses, stars, etc. One hundred built-in shapes are available |  |
| ielkLine | TIELineLayer | Layer that displays a single line, optionally including a text label and start and ending arrows |  |
| ielkPolyline | TIEPolylineLayer | Layer that displays a polyline or polygon of multiple points | |
| ielkAngle | TIEAngleLayer | Layer that displays an angle |  |
| ielkText | TIETextLayer | Layer that displays text |  |

Note: If you are transitioning your code from TImageEnVect Objects to TIELayers, read our transition guide.
Overview
Layer Insertion and Editing
Layers can be inserted programmatically using LayersAdd or LayersInsert, and manipulated using CurrentLayer or Layers.You can also allow your users to add and edit layers using Mouse Interactions, such as mlCreateImageLayers and mlClickCreatePolylineLayers.
Keyboard Shortcuts
The following keyboard shortcuts are also available (if vkiLayerEditing is included in KeyInteract):| Description | Type | Shortcut |
|---|---|---|
| Move layer | - | Cursor Keys (Hold Shift to move faster) |
| Resize layer | - | Ctrl+Cursor Keys (Hold Shift to size faster) |
| Remove the current layer (Deletion can be disabled using loPreventLayerDelete) | ieksDelete | Delete |
| Edit the text of the current layer | ieksEditText | F2 |
| Select next layer (Hold Shift to get previous) | - | Ctrl+Tab |
| Move layer forward (Hold Shift to move to very front) | ieksBringForward | Ctrl+] |
| Send layer back (Hold Shift to move to very back) | ieksSendBackward | Ctrl+] |
| Increase the size of the font of a text or line layer, or the border | ieksIncreaseFontSize | Ctrl+Period |
| Decrease the size of the font of a text or line layer, or the border | ieksDecreaseFontSize | Ctrl+Comma |
| Display the Properties Dialog | ieksProperties | Alt+Enter |
| Select all layers | ieksSelectAll | Ctrl+A |
| Select the font for a text or line layer | ieksFontSelect | Ctrl+D |
| Toggle bold of the font of a text or line layer | ieksBold | Ctrl+B |
| Toggle italics of the font of a text or line layer | ieksItalic | Ctrl+I |
| Toggle underline of the font of a text or line layer | ieksUnderline | Ctrl+U |
| Align text left (top) | ieksLeftAlign | Ctrl+L (Hold Shift to align to top) |
| Align text center | ieksCenterAlign | Ctrl+E (Hold Shift to to vertically center) |
| Align text right (top) | ieksRightAlign | Ctrl+R (Hold Shift to align to bottom) |
| Justify text | ieksJustified | Ctrl+J |
| Cut layer to clipboard | ieksCut | Ctrl+X |
| Copy layer to clipboard | ieksCopy | Ctrl+C |
| Paste layer from clipboard | ieksPaste | Ctrl+V |
| Cancel text editing or line or polyline insertion | - | Escape |
| Enact text editing or polyline insertion | - | Enter |
| Invert the angle of an layer (e.g. 90° will become 270°) | ieksInvertAngle | Alt+I |
| Increase the curve of a line layer | ieksIncreaseCurve | Alt+Up |
| Decrease the curve of a line layer | ieksDecreaseCurve | Alt+Down |
| Clear the formatting from a rich formatted text layer | ieksClearFormatting | Ctrl+Space |
| Increase the width of the border or line | ieksIncreaseBorder | Ctrl+Period |
| Decrease the width of the border or line | ieksDecreaseBorder | Ctrl+Comma |
| Select a fill color for the layer | ieksBackColorSelect | Ctrl+G |
| Undo the last action | ieksUndo | Ctrl+Z |
| Redo the last action | ieksRedo | Ctrl+Y |
These shortcuts can be configured or disabled using KeyboardShortcuts. Also, the effect of the Ctrl, Alt and Shift modifiers can be configured with ShiftKeyLock
Loading and Saving
Standard image types such as JPEG and BMP, do not support layers, so to preserve your layer information you will need to use one of the following formats:◼ImageEn Native Format (*.ien): Maintains all layer information. Supported only by ImageEn (Loading and Saving)
◼Photoshop (*.psd): Widely used layer format. Only image layers are supported; non-image layers will be converted when saving (Loading and Saving)
◼Adobe PDF (*.pdf): Widely used document format. PDF objects can be imported as layers, and layers can be saved as PDF files
◼Scalable Vector Graphics (*.svg): Vector image format for web browsers. SVG objects can be imported as layers, and layers can be saved as SVG files
Layer Components
You can preview and manipulate the layers in a TImageEnView using TImageEnLayerMView.
You can display and edit properties of the current layer using TIELayerProps.

Demos
| Demo | Description | Demo Project Folder | Compiled Demo |
|---|---|---|---|
| All Layer Editing | Usage of image, shape, text, polygon and line layers | LayerEditing\Layers_AllTypes\Layers.dpr |  |
| ImageEn Layer Actions | Image Layering application built using only ImageEnView Layer actions | Actions\Actions_Layers\LayerActions.dpr | |
| Image Layer Editing | Usage of image layers | LayerEditing\Layers_Images\Layers.dpr | |
| Line Layer Editing | Creating and point editing line, poly-line and angle layers | LayerEditing\Layers_Lines\Layers.dpr | |
| Text Layers | Adding and editing text layers, including rich formatting | LayerEditing\Layers_Text\TextLayers.dpr | |
| Adding Text to Images | Draw text onto images using text layers | LayerEditing\Layers_TextOut\TextLayers.dpr | |
| Dragging to Create Layers | Dragging text, images and shapes onto a TImageEnView to create layers | LayerEditing\DragDropLayers\Layers_DragDrop.dpr | |
| Custom Drawing Layers | Custom drawing layers to highlight content in the background layer | LayerEditing\Layers_CustomDraw\LayersDraw.dpr | |
| Layer Masks | Using a mask to hide portions of an image layer | LayerEditing\LayerMask\LayerMask.dpr | |
| Layer Rotation | Free rotation and resizing of layers using mouse interactions | LayerEditing\RotateLayers\RotateLayers.dpr | |
| Magic Fill to Polygon | Creates a polygon (closed TIEPolylineLayer) by performing a magic selection on an image (matching color range) | LayerEditing\MagicFillToPolygon\Magic2Polygon.dpr | |
| Stamp Layers | Add text, shapes, images and arrows directly to an image by clicking and dragging | LayerEditing\StampTextAndShapes\StampLayers.dpr | |
| User Data in Layer | Store your own custom data with layers in a TImageEnView | LayerEditing\UserDataInLayer\UserDataInLayer.dpr | |
| Database Layers Demo | Adding annotations to an image stored within a database blob field using FireDAC and a TIEDBBitmap | Database\DBDemo_Layers\DBDemoLayers.dpr | |
Examples
ImageEnView1.LayersAdd( ielkImage ); // Append an image layer
ImageEnView1.IO.LoadFromFile('C:\image.jpg'); // Load image into the new/active layer
// Add a yellow explosion shape layer at size 220 x 120
ImageEnView1.LayersAdd( iesExplosion, 50, 50, 220, 120 );
ImageEnView1.CurrentLayer.FillColor := clYellow;
ImageEnView1.CurrentLayer.BorderWidth := 0;
ImageEnView1.Update();
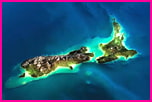
// Append an image layer and apply a pink border
ImageEnView1.LayersAdd( ielkImage ); // Append an image layer
ImageEnView1.IO.LoadFromFile('C:\New Zealand.jpg'); // Load image into the new/active layer
ImageEnView1.CurrentLayer.BorderColor := $008000FF;
ImageEnView1.CurrentLayer.BorderWidth := 3;
ImageEnView1.Update();
// Allow users to create image layers. Prompt for an image file after selection
ImageEnView1.LayerOptions := ImageEnView1.LayerOptions + [ loAutoPromptForImage ];
ImageEnView1.MouseInteractLayers := [ mlCreateImageLayers ];
// Allow user to move and resize layers (allow multiple layer selection and ensure masks are moved with layers)
ImageEnView1.LayerOptions := ImageEnView1.LayerOptions + [ loAllowMultiSelect, loAutoSelectMask ];
ImageEnView1.MouseInteractLayers := [ mlMoveLayers, mlResizeLayers ];
A selected text layer with resize grips:
// Allow user to rotate layers
// Enable multiple layer selection, ensure masks are moved with layers and show a rotation grip
ImageEnView1.LayerOptions := ImageEnView1.LayerOptions + [ loAllowMultiSelect, loAutoSelectMask, loShowRotationGrip ];
ImageEnView1.MouseInteractLayers := [ mlRotateLayers ];
// Allow the user to create, size and rotate red arrows
ImageEnView1.LayerOptions := ImageEnView1.LayerOptions + [ loShowRotationGrip ];
ImageEnView1.MouseInteractLayers := [ mlCreateLineLayers, mlMoveLayers, mlResizeLayers, mlRotateLayers ];
ImageEnView1.LayerDefaults.Clear();
ImageEnView1.LayerDefaults.Values[ IELP_LineColor ] := 'clRed';
ImageEnView1.LayerDefaults.Values[ IELP_LineWidth ] := '6';
ImageEnView1.LayerDefaults.Values[ IELP_LineShapeSize ] := '20';
ImageEnView1.LayerDefaults.Values[ IELP_LineStartShape ] := '1';
ImageEnView1.LayerDefaults.Values[ IELP_Rotate ] := '235';
Allow user to create star shapes at preferred aspect ratio
ImageEnView1.LayersResizeAspectRatio := iearAlways;
IEGlobalSettings().DefaultLayerShape := iesStar5;
ImageEnView1.MouseInteractLayers := [ mlCreateShapeLayers ];
// Allow user to draw a polygon
ImageEnView1.LayersAutoClosePolylines := iecmAlways;
ImageEnView1.MouseInteractLayers := [ mlClickCreatePolylineLayers ];
// Allow users to create and edit a polyline
ImageEnView1.LayersAutoClosePolylines := iecmManual;
ImageEnView1.MouseInteractLayers := [ mlClickCreatePolylineLayers, mlEditLayerPoints ];
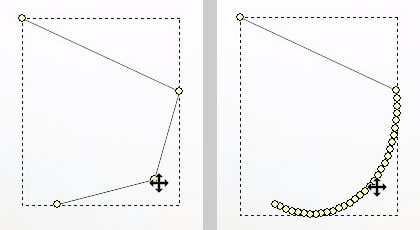
// Allow users to edit a polyline. Hold Alt key to turn line into a curve
ImageEnView1.MouseInteractLayers := [ mlEditLayerPoints ];
// Draw a Smiley Face
// make layer lines thicker
ImageEnView1.LayerDefaults.Values[ IELP_BorderWidth ] := '10';
ImageEnView1.LayerDefaults.Values[ IELP_FillColor ] := 'clWhite';
// LEFT EYE
// Add an ellipse shape layer
ImageEnView1.LayersAdd( iesEllipse, 100, 100, 30, 30 );
// RIGHT EYE
// Add an ellipse shape layer
ImageEnView1.LayersAdd( iesEllipse, 170, 100, 30, 30 );
// SMILE
// Add a line layer
ImageEnView1.LayersAdd( Point( 100, 150 ), Point( 200, 150 ));
// Curve it
TIELineLayer(ImageEnView1.CurrentLayer).Curve := 1;
// Show changes
ImageEnView1.Update();

// Enable our star stamping mode, which adds a star directly to the image wherever the user clicks
procedure Tfmain.btnAddStampClick(Sender: TObject);
const
Stamp_Border_Color = clRed;
Stamp_Border_Width = 2;
Stamp_Fill_Color = clYellow;
Stamp_Shape = iesStar5;
Stamp_Width = 50;
Stamp_Height = 50;
var
cursorBMP: TIEBitmap;
begin
// Set default style of our layer
// Note: Can also use OnNewLayer event to customize further
ImageEnView1.LayerDefaults.Clear();
ImageEnView1.LayerDefaults.Values[ IELP_BorderColor ] := ColorToString( Stamp_Border_Color );
ImageEnView1.LayerDefaults.Values[ IELP_BorderWidth ] := IntToStr( Stamp_Border_Width );
ImageEnView1.LayerDefaults.Values[ IELP_FillColor ] := ColorToString( Stamp_Fill_Color );
// Easier to use DefaultLayerShape... ImageEnView1.LayerDefaults.Values[ IELP_Shape ] := IntToStr( Ord( Stamp_Shape ));
ImageEnView1.LayerDefaults.Values[ IELP_Width ] := IntToStr( Stamp_Width );
ImageEnView1.LayerDefaults.Values[ IELP_Height ] := IntToStr( Stamp_Height );
// Enable stamp mode, and automatic merging of layers
ImageEnView1.LayerOptions := ImageEnView1.LayerOptions + [ loStampMode, loAutoMergeNewLayers ];
IEGlobalSettings().DefaultLayerShape := Stamp_Shape;
ImageEnView1.MouseInteractLayers := [ mlCreateShapeLayers ];
// Show a matching star shaped cursor
cursorBMP := TIEBitmap.Create( Stamp_Width, Stamp_Height );
try
cursorBMP.FillWithShape( Stamp_Shape, Stamp_Width, Stamp_Height, Stamp_Border_Color, Stamp_Border_Width, Stamp_Fill_Color, True, False );
ImageEnView1.SetZoneCursorBitmap( cursorBMP );
finally
cursorBMP.Free;
end;
end;
See Also
◼TIELayer◼LayersAdd
◼LayersInsert
◼TIELayerKind
◼MouseInteractLayers
◼LayerOptions
◼#Layer Tags